|
Trouble was brewing with the exhaust
system. I had noticed exhaust soot collecting where the water
cooled exhaust manifold connected to the straight pipe exhaust.
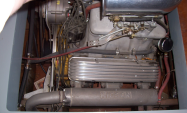
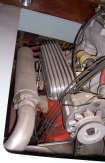
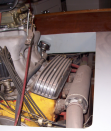
The pictures below (click to enlarge) show the new exhaust
system. The design is the same as the original.
We had an exhaust leak near the exhaust
manifold end cap where the water cooled manifold connects
to the single wall exhaust tubing. But determining the exact
location would be difficult. No leak as observable at idle,
and under power, the boat is moving far too fast to try and
look up there and see the leak.
Take a look at this huge collection
of fun woodworking plans for one low price
This exhaust system uses a water cooled
manifold with a 3 inch pipe thread in the end cap. A short
section of galvanized threaded pipe is used to transition
out of the end cap, and then standard exhaust tubing is welded
to that to run the length of the exhaust.
It was finally determined that the
leak was coming from the threads between the end cap and the
pipe. Soot would be ejected from this leak and collect on
the adjacent wall of the engine well. A conclusion that would
turn out to be wrong as we shall see. I formed a plan to simply
plug the leak using an excellent product called Pyro Putty
by Aremco Products Inc.
They specialize in high temperature products, and Pyro Putty
was just the ticket. A high temperature epoxy that I would
use to putty in the problem area.
My plans would soon change though.
After preparing the area by scrubbing the leak area with a
wire brush, I realized that this wasn't just a simple leak.
The galvanized pipe was corroding from the inside, and the
leak area was coming from the thread valleys in the pipe.
The right thing to do was to replace the exhaust system below
the manifold.
This turned into a huge job. First
there would be the removal of the original, and then custom
fabricating of the new.
Removing the original meant cutting
the tubing in half about halfway down its length, just to
get it out of the boat. Once cut into pieces, I would have
to unscrew the pipe threaded section from the manifold end
cap. This unthreading proved to be an extremely difficult
task with a simple solution.
The tubing has a U shape bend taking
exhaust from the front of the engine, curving down, and then
running strait back through the transom. Exhaust is done this
way to prevent water from flowing up the pipe and into the
exhaust ports of the heads. I used this curve to my advantage
to try and separate the manifold from the pipe threaded section
of pipe. Having clamped the manifold between 2x4s in a vice,
I tried to unscrew the pipe thread section. Leaning all my
rather substantial weight on the thing, and after pounding
the hell out of it with a hammer, waking the dead, the corroded
threaded section finally gave way rather than unthread.
That was fine by me, and all I had
to do now is pick out the remains of the galv pipe threads
left in the manifold end cap, and clean out the threads of
the cap.
Now begins the custom fabrication,
but whom I gonna call? I had taken a few Polaroids before
the dismantling to discuss with local muffler shops.
Talk about a deer caught in headlights,
they all had glassed over eyes at the idea of doing anything
custom. Like the average fast food tomato cashier - if you
ask for something different, then confusion and panic ensues.
I needed a muffler shop with a "No
muff too tough" attitude. And I finally found one in
an indi shop in an industrial park on the north side of town.
The manager called his fab guy over, he looked at my photos,
listened to me, shrugged, and said "Sure, bring her by".
Now it was me with the glazed over eyes - I tipped him with
a 12 pack of the King of Beers when he finished. Sorry, but
I cannot remember the name of the shop, but if anyone emails
me, I'll take time to drive over there and look them up. I
owe them that.
I had a lot to think about how this
could be done. We have pipe sections that thread into the
manifold, a long section of pipe, and bends in the pipe. We
wouldn't want to thread the pipe into the manifold first because
welding to the exhaust tubing would cause a great deal of
heat on the end cap gasket. Plus welding in blind spots...
The work was done in two phases. First,
I would install some straight tubing to run about half the
length and out the transom. The second phase would be custom
fitting by my new buddy.
A few days later I took him some drawings
(In used to work as a mechanical designer & drafter) of
straight pieces of tubing I needed to prepare for the his
retrofitting work. Because this was a post-construction job,
installation was complicated. Before the boat was finished,
it would be easy to lay a long piece of exhaust tubing from
the front of the engine to the transom. But with the deck
in place (since the 60s that is) I had to plan on doing a
2 piece exhaust system.
The drawing called for strait tubing
at a length that I could slide into place before the retro
work was done. This piece (one for each side) would be flaired
with a flange and clamp to mate with his retrofitting work.
He would then have to form his custom work up to mate with
a matching flange. The other end of this tubing would mate
up to the transom. exhaust portal.
After placing these two pieces, I brought
the boat by the shop, and having some spare time on my hands,
I hung out and helped where I could. There were a few customers
now and then that needed regular muffler jobs, but my buddy
took care of each of them in short order - back to the fun
custom work.
I provided the galvanized threaded
pipe bits, and so he could measure, I installed them into
the end caps without tightening. Then we removed the pipe
bits to be welded onto the tubing. I decided I would spin
the end caps onto the pipe once done and then bold the caps
to the manifold. He welded the pipe bit onto standard exhaust
tubing, and used a high tech piece of coat hanger wire to
measure the bends he needed. I didn't feel too comfortable
about that, but I was dealing with a pro here, so... Then
there was the water squirt. Water exiting the engine is introduced
into the exhaust down stream to cool the single wall tubing.
These pieces I provided and were welded in place too.
Once we were all said and done, I took
everything home, tightened the end caps onto the threaded
pieces until the caps bolt pattern lighned up, and bolted
the clamps mid section.
Good as new. No, Better than new.
|