|
This site is best viewed with Mozilla
Firefox
DragTracker v1.0
HaresWARE Developement
Copyright 2002 All rights reserved
DragTracker v1.0 is a handy companion
for any drag racing fan. Maintain team profile information
including driver, competition class, chief mechanic, and team
owner. Then create an event profile for this week's event
using the team profiles. During qualifying, a drag and drop
interface allows you to quickly and easily track results for
any competition class. Then, a nifty eliminations ladder allows
you to advance teams through elimination rounds, and see at
a glance what match-ups to expect. You can review or reference
final eliminations results from each event and class you've
tracked for the entire year. Add in a national-records screen
for quick easy reference, and much more, and you have DragTracker
v1.0.
At a glance.
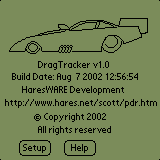
When you start DragTracker for the for the first time, you
will be presented with the following splash screen:
A menu system is active through out the application, and
can be used to navigate between the four main screens that
comprise DragTracker v1.0.


The four main screens of DragRacing v1.0 are as follows.
A help system is accessible from each of the main screens
by tapping on the 'i' icon at the top of each of the main
screens.
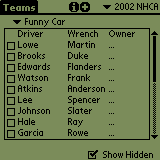
Teams - Set up team profiles including drivers name, which
class the team competes in, the chief mechanic, and the team
owner. Click on a cell in the table for an editable list of
selections. The Hidden checkbox is discussed later. Add a
team be pressing the + icon at the top of any of the main
screens.
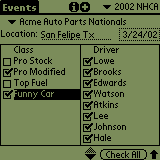
Events - Get ready for this weekends event. Here, you create
new events, enter the date and location, check the classes
of interest, and the drivers that will be participating.
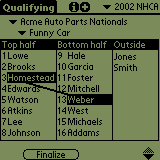
Qualifying - It's Saturday, and time to start tracking results.
Select the event, and the class, and the screen will populate
with the teams selected from the Events screen. As qualifying
progresses, you can drag and drop the teams from their current
position into a new position to reflect their new position
in the standings.
Eliminations - Once the qualifying is over, and you have
pressed the Finalize button, the Eliminations screen arranges
the data in a tree form according to qualify position. From
here, you can advance drivers through the eliminations rounds
for each class until the event is over. Do this by clicking
on a cell and selecting Advance.
Detailed instructions:
Working with Years.
In any of the four main screens, you will see a pull-down
that displays the list of years. The following screen snip
shows the year (2002) and Edit... When you create a new year,
you are also required to enter a 4 character sanctioning body.
This allows you to have track each sanctioning body events
with out having all the teams and events stored in the same
database.

Each year is saved on the device as a separate database.
Selecting a year opens the year and its data can be accessed
and updated from the Setup screens.
Note: Edit... shows up only
from the two setup screens, Teams, a
nd Events.
When Edit... is selected, you will see the following
screen
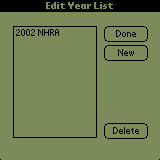
From this screen you can delete year
databases, create new ones, or clone existing databases. Cloning
a database is helpful in that the teams and events are copied
from the cloned year to the new year. This means that you
do not have to re-enter all the data for each year of racing.
Just clone a year and make any modifications required to correctly
reflect the teams, events, locations, dates etc...
Note: The Clone button only appears when a year is selected
in the list.
Working with Classes.
In any of the four main screens, you will see a pull-down
that displays the list of classes. The following screen snip
shows a class drop-down including All and Edit... entries
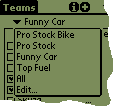
Note: Edit... shows up only from the two setup screens,
Teams, and Events.
When Edit... is selected, you will see the following
screen
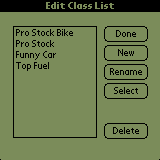
From this screen you can delete, create, or rename classes.
As a convenience, the select button can be pressed. This will
close the Edit Class screen and make the selected class current.
Working with Teams.
Here is the Teams screen again. We've already discussed the
Year and Class pull-downs. The four columns of this screen
consist of Driver, Class, Wrench, and Owner. The Add Driver
button (the 'i' icon) up an Edit Driver screen, which is similar
in look and feel to the Edit Class screen, discussed earlier.
When a driver is added it will appear in the table with blanks
for Wrench and Owner (the Class will automatically be set
to whatever class was selected when the driver was added).
Clicking on any field in the table
will bring up a list that lets you edit or select Class, Wrench,
or Owner, and clicking on any driver will bring up the Edit
Driver screen.
Show Hidden - The checkbox to the left
of each driver indicates whether or not a driver is hidden.
Hiding a driver is useful in the event that a driver is out
of commission for some time, but you expect the absence to
be temporary. Marking the driver hidden removes the clutter
from following screens, without the need to re-enter the data
when the driver returns.
A driver marked hidden does not appear
unless Show Hidden is checked. If Show Hidden is checked,
then hidden drivers will appear, but with the checkbox set.
Working with Events.
Here is the Events screen again. This screen includes an Event
pull-down. The Event pull-down displays a list of events,
along with Edit... Selecting Edit... shows a screen that allows
you to create, delete, rename or select events.
When working with events, you first
need to check all classes of interest for this event. This
is a necessary step since not all classes compete at all events.
Or you might not always be interested in all the classes.
When you check or highlight a class,
a list of drivers is displayed to the right. Place check marks
next to all of the drivers who will be attending this event.
If you are unsure, don't worry, you will be able to select
the participants during Qualifying and even Eliminations.
The Check All button is a convenient
way of selecting all the teams as participants. You can then
uncheck any teams that do not participate.
Working with Qualifying.
This screen includes an Event selection pull-down and a Class
selection pull-down. There are also three tables labeled Top
half of the field, the Bottom half, and those who are "Outside
looking in".
Clicking on any empty slot in a table
pops up a list from which select a team, incase you did not
have a complete list of participants during Event setup.
Clicking on any populated slot allows you to drag and drop
that team into a new position as qualifying progresses.
Once qualifying is complete, you can
press the Finalize button. This clears out the teams who remain
"Outside looking in", giving you a complete 16 car
field for that class. Once and Event/Class is finalized you
will not be able to make changes to the qualifying field.
Finalizing is required before edits will be enabled in the
Eliminations screen.
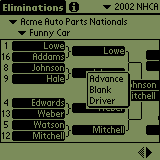
Working with Eliminations
This screen includes an Event selection pull-down and a Class
selection pull-down, and a tree like representation of the
finalized qualifying results.
The Eliminations tree can be scrolled
by dragging your stylus across the screen left or right. The
scroll buttons at the bottom right will scroll the window
all the way to the right or left with just one click.
You can advance a driver through elimination
rounds by clicking on the winning driver, and selecting Advance
from the resulting pop-up.
If you missed qualifying for any reason, you can still add
drivers at this point by clicking
Clicking on any empty slot in the eliminations
tree will bring up a driver selection list. This allows you
to add drivers/teams to the eliminations tree in the event
that you missed the qualifying rounds and do not have the
qualifying results.
Finalize
Once eliminations are complete, and the Winner slot is filled,
a Finalize button will appear. Clicking this button will archive
the results for review at any time. Archiving results is useful
so that team configuration is maintained through out the season.
For example, suppose a team undergoes
chief mechanic change mid-season. You return to the Teams
setup page and make the changes. Without the archiving feature,
the change you made would be reflected in results as if that
new chief mechanic were on the job for the entire season.
Archiving results ensures accurate results can be reviewed
at any time after the event is complete. It is in essence
a snapshot of team configurations at the time of the event.
Note: Eliminations Event/Classes can only be archived once.
The finalize button will not appear again for the same Year/Event/Class.
|